14. (32 Page) Saddle Stitch & Cutting Marks – Urdu & Hindi | Ai | Kodak Preps

Episodes


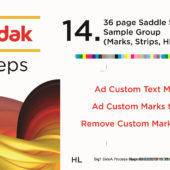


14. (32 Page) Saddle Stitch & Cutting Marks – Urdu & Hindi | Ai | Kodak Preps
admin | January 10, 2022
Welcome to our comprehensive tutorial on 32 page Saddle Stitch & Cutting Marks. This guide will walk you through the essential steps to ensure your booklets and brochures are perfectly bound and cut.
Understanding Saddle Stitch
Saddle stitching is a popular binding method used for booklets, brochures, and magazines. It involves folding sheets of paper and stapling them together along the fold, creating a professional and durable product.
Key Steps in 32 Page Saddle Stitch
Setting Up Your Document
To begin, set up your document with the correct dimensions. For a 32-page booklet, ensure that your pages are arranged in multiples of four, as each folded sheet will create four pages.
Printing the Pages
Next, print the pages in the correct order, ensuring that the front and back of each sheet align properly. Use high-quality paper and ink to enhance the durability and appearance of your booklet.
Folding and Stapling
Then, carefully fold the printed sheets in half. Ensure that the staples are evenly spaced and penetrate all the layers of paper.
Adding Cutting Marks
Importance of Cutting Marks
Cutting marks are essential for ensuring that the final product is trimmed to the correct size. They guide the cutting process, ensuring precision and consistency.
Placing Cutting Marks
Furthermore, place cutting marks at the corners of each page. These marks should be outside the bleed area, ensuring that no important content is cut off during the trimming process.
Final Adjustments
Trimming the Edges
Afterward, once the pages are stapled and folded, trim the edges of the booklet using a sharp paper cutter. Follow the cutting marks to ensure a clean and professional finish.
Checking the Final Product
Finally, inspect the final product for any imperfections. Ensure that all pages are aligned and the cutting marks have been properly followed.
Benefits of Using 32 Page Saddle Stitch & Cutting Marks
Using the 32-page Saddle Stitch & Cutting Marks technique offers several advantages:
- Professional Appearance: Ensures a clean and professional look.
- Durability: Provides a strong and durable bind.
- Consistency: Maintains consistency in booklet production.
Extensive Tutorial Series
Additionally, we offer a series of tutorials covering various aspects of bookbinding and cutting techniques. These tutorials are available on our YouTube channel and website, providing in-depth knowledge and practical tips.
Conclusion
In conclusion, this guide on using 32 page Saddle Stitch & Cutting Marks provides a complete overview of the process, ensuring you achieve professional and durable results. By following this guide and exploring our additional tutorials, you will be well-equipped to produce high-quality booklets and brochures.
Next Tutorial: 32 Pages Saddle Stitch 4 x 5.75
Written by admin